▷ 문의 게시판 리스트 만들기
Step 1. 문의 게시판 DB table (q_board) 만들기
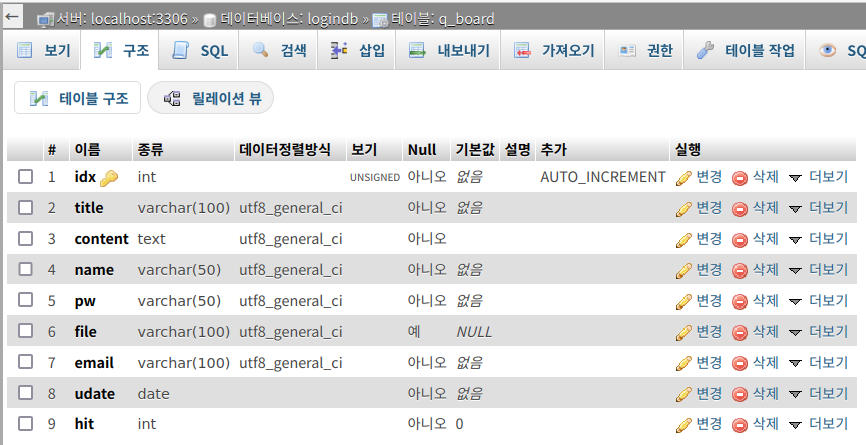
idx: 게시글 번호 (A_I (Auto Increment) 설정으로 DB에 데이터가 입력되면 자동으로 1씩 늘어난다)
title: 글 제목
content: 글 내용
name: 작성자
pw: 게시글 비밀번호
file: 업로드한 파일
email: 게시글에 남길 연락처
udate: 날짜
hit: 조회수
Step 2. 메인페이지(main.php)에서 문의게시판 페이지(qna.php) 연결하기
버튼 클릭 → qna.php로 이동
<div>
    <button type="button" onclick="location.href='qna.php';">문의게시판</button>
</div>
전체 (더보기 클릭)
<body> 태그 안
<?php
    if(!isset($_SESSION['username'])) {
        echo "<span>Please Log In</span>";
?>
	<div class = "btn-area" style = "display: flex; text-align: center;" >
	    <div>
		<button type="button" onclick="location.href='login.php';">로그인</button>
	    </div>
	    <div>
		<button type="button" onclick="location.href='list.php';">게시판</button>
	    </div>
	    <div>
		<button type="button" onclick="location.href='qna.php';">문의게시판</button>
	    </div>
    </div>
<?php } else {
    $login_id = $_SESSION['username'];
    $connect = mysqli_connect('localhost', 'root', 'mysql', 'logindb');
    $sql = "SELECT * FROM login where login_id = '$login_id' ";
    $res = mysqli_fetch_array(mysqli_query($connect, $sql));
    $name = $res['name'];
    $_SESSION['name'] = $res['name'];
    echo "<span>반갑습니다! $name 님</span>";?>
	<div class = "btn-area">
	    <div>
		<button type="button" onclick="location.href='logout.php';">로그아웃</button>
	    </div>
	    <div>
	    <button type="button" onclick="location.href='list.php';">게시판</button>
	    </div>
    </div>
    <div class = "btn-area" >
	    <div>
		<button type="button" onclick="location.href='mypage.php';">마이페이지</button>
	    </div>
	    <div>
		<button type="button" onclick="location.href='qna.php';">문의게시판</button>
	    </div>
    </div>
<?php }; ?>
Step 3. 문의게시판 리스트는 일반 게시판과 비슷하게 만든다
table 상단 바를 간략하게 수정하고 아래에 출력될 게시글을 문의게시판에 맞게 수정한다
<tr>
    <th width=70>번호</th>
    <th width=500>제목</th>
    <th width=100>작성자</th>
    <th width=200>작성일</th>
    <th width=70>조회수</th>
</tr>
table 전체 (더보기 클릭)
일반 게시판 코드를 일부 수정해서 적용
※ 문의게시판의 모든 페이지 php 쿼리문에서 DB table을 q_board로 수정해야한다
    <table align=center>
        <thead align="center">
            <tr>
                <th width=70>번호</th>
                <th width=500>제목</th>
                <th width=100>작성자</th>
                <th width=200>작성일</th>
                <th width=70>조회수</th>
            </tr>
       </thead>
        <?php
            $conn = mysqli_connect('localhost', 'root', 'mysql', 'logindb');

            $n_sql = "SELECT count(*) FROM q_board";
            $n_result = mysqli_query($conn,$n_sql);
            $row = mysqli_fetch_row($n_result);
            $num = $row[0];

            $list_num=5; //한 페이지에 보여줄 개수
            $page_num=3; //블록 당 보여줄 페이지 개수
            $page=isset($_GET['page'])? $_GET['page'] :1;

            $total_page = ceil($num/$list_num); //전체 페이지 수

            $now_block = ceil($page/$page_num); //현재 블록 번호

            $block_start=(($now_block-1)*$page_num)+1;// 블록의 시작 번호
            if($block_start <= 0){
              $block_start =1;
            }

            $block_end=$now_block*$page_num; //블록의 마지막 번호
            if($block_end>$total_page){
              $block_end=$total_page;
            }

            $page_start=($page-1) * $list_num;
            $sql2 = "SELECT * FROM q_board ORDER BY idx DESC LIMIT $page_start, $list_num";
            $result = mysqli_query($conn, $sql2);
            $cnt = $page_start+1;

            while($row = mysqli_fetch_array($result)){
        ?>
            <tbody>
                <tr align=center>
                    <td><?php echo $cnt;?></td>
                    <td width="500" align="center"><a href="q_check.php?idx=<?=$row['idx']?>"><?php echo $row['title'];?></a></td>
                    <td width="100" align="center"><?php echo $row['name'];?></td>
                    <td width="200" align="center"><?php echo $row['udate'];?></td>
                    <td><?php echo $row['hit'];?></td>
                </tr>
                <?php
                $cnt++;
                ?>
            </tbody>
        <?php } ?>
    </table>
▷ 문의게시글 작성 페이지 (q_write.php) 및 게시글 작성 처리 페이지(q_write_ok.php)
Step 1. 일반 게시판의 글 작성 페이지와 비슷하지만 회원 검증은 하지 않는다
대신 문의게시글 작성 시 게시글에 연락처 및 비밀번호 남기기
form 태그를 이용해 post 방식으로 입력한 정보를 q_write_ok.php로넘긴다
** q_write.php 페이지 (더보기 클릭)
<!DOCTYPE html>
<html lang="ko">
<head>
<meta charset="UTF-8">
<title>write</title>
</head>
<body>
<form method="post" action="q_write_ok.php" enctype="multipart/form-data" autocomplete="off">
<table align=center width=auto border=0 cellpadding=2>
<tr>
<td>
<p><b>Write</b></p>
</td>
</tr>
<tr>
<td>
<table class="table2">
<tr>
<td>이름</td>
<td><input type="text" class="t_box" name="name" cols=20 size=15 required></td>
</tr>
<tr>
<td>제목</td>
<td><input type="text" class="t_box" name="title" cols=25 size=40 required></td>
</tr>
<tr>
<td>내용</td>
<td><textarea name="content" class="t_box" cols=40 rows=15 required></textarea></td>
</tr>
<tr>
<td>첨부파일</td>
<td><input type="file" name="file"></td>
</tr>
<tr>
<!--연락처, 비밀번호 칸 추가-->
<td>연락처(E-MAil)</td>
<td><input type="text" class="t_box" name="email"cols=25 size=40 required></td>
</tr>
<tr>
<td>비밀번호</td>
<td><input type="password" class="t_box" name="pass" cols=25 size=15 autocomplete="new-password" required></td>
</tr>
</table>
</td>
</tr>
</table>
<div class="read_btn">
<button class="read_btn1" type="submit">작성</button>
</div>
</form>
</body>
</html>
Step 2. q_write_ok.php 페이지에서 q_board table에 작성된 데이터를 쿼리문(insert)으로 처리한다
** q_write_ok.php 페이지 (더보기 클릭)
<?php
    session_start();

    $conn = mysqli_connect('localhost', 'root', 'mysql', 'logindb');

    $uname = $_POST['name']; //작성자
    $title = $_POST['title']; //타이틀
    $content = $_POST['content']; //내용
    $email = $_POST['email']; //연락처
    $pass = $_POST['pass']; //비밀번호
    $hash = md5($pass);

    //변수
    $error = $_FILES['file']['error'];
    $tmpfile = $_FILES['file']['tmp_name'];
    $filename = $_FILES['file']['name'];
    $folder = "./file/uploads/".$filename;

    if( $error != UPLOAD_ERR_OK ){ //오류 확인
    switch( $error ) {
            case UPLOAD_ERR_INI_SIZE:
            case UPLOAD_ERR_FORM_SIZE:
                echo "<script>alert('파일이 너무 큽니다.');";
                echo "window.history.back()</script>";
                exit;
        }
    }
    move_uploaded_file($tmpfile, $folder);

    //데이터를 q_board 테이블의 각 컬럼에 추가한다
    $sql = "INSERT INTO q_board(title, content, name, pw, file, email, udate, hit) VALUES ('$title','$content','$uname','$hash','$filename', '$email', now(), 0);";

    $res = mysqli_query($conn, $sql);

    if($res) {
        echo "<script>alert('게시글이 작성되었습니다.');";
        echo "window.location.replace('qna.php');</script>";
    } else {
        echo mysqli_error($conn);
    }
?>
※ 문의게시판 페이지 구현
qna.php (문의게시판 리스트 페이지)

q_write.php (문의 게시글 작성 페이지)

글 작성 완료

'Web Hacking Study > Web Page 만들기' 카테고리의 다른 글
| 웹 개발 환경 구축 oracle DB, tomcat (jsp, oracle) (0) | 2024.04.22 |
|---|---|
| 문의게시판 (문의 글 비밀번호 설정) (0) | 2022.06.22 |
| 게시판 페이지 개발 (날짜, 제목, 조회 순 정렬) (0) | 2022.06.20 |
| 마이페이지 (개인정보 확인, 개인정보 수정, 비밀번호 변경 기능) (0) | 2022.06.19 |
| 게시판 페이지 개발 (좋아요/좋아요 취소) (0) | 2022.06.15 |

댓글